

Looking for something fun and eco-friendly to do with the kids this week? Try out these super cute Earth Day crafts for kids.
Milk Carton Bird Feeder
Recycle a milk carton and make new feathered friends with this creative nature Earth Day craft for kids! Put the feeder somewhere close enough where kids can spy on their bird visitors—see how many birds you can recognize!

What You’ll Need:
- Empty quart sized cardboard milk carton
- Scissors
- String or cord
- Hole punch or pencil
- Bird seed
How To Make It:
- Have an adult cut a hole in the bird feeder – it should be big enough so a bird could come and sit and eat the feed, but not too big or the carton will become unstable.
- Have an adult cut a hole using the hole punch in the top of the milk carton and put a string through the hole. Alternatively, you can poke a hole on either side of the flap at the top of the carton by poking a pencil through the top.
- Tie a knot in the string.
- Fill the carton with bird seed until it reaches the top of the hole.
- Hang the cart on a tree branch and watch the birds enjoy their snack!
Tips:
- A quart size carton works perfect as it isn’t too large and holds a decent amount of food.
- You may choose to decorate the outside of the carton but keep in mind that it will be outside in the elements and decorations may wash off in the rain. Also, you wouldn’t want the birds pecking at flaking paint!
- Check your bird feeder regularly and refill as needed.
Craft and photo courtesy of Kaboodle.com.
Tin Can Herb Pots
Make these charming tin can herb pots and watch them grow all summer long! This project not only recycles, it creates new life! Your child can watch her plants grow for months to come and be proud that she created the container that holds them.

What You’ll Need:
- Empty aluminum can
- Screwdriver and hammer
- Liquid gesso (recommended: Liquitex Basics Gesso)
- Acrylic craft paints in colors of your choice
- Acrylic sealer spray, matte finish
- Craft stick
- Thin cardboard
- Pinking shears
- Black permanent marker
- 5-10 small rocks, stones or pebbles
- 1.5 cups potting soil
- 4-inch potted herb plant
- White craft glue
- Water
- Flower stickers (optional)
How To Make It:
- Completely wash and dry aluminum can. If necessary, sand off any rough edges from opening of can.
- Turn can upside down. Parent should use screwdriver or other pointed object to poke holes in the bottom of the can. Use a hammer to tap the end of the screwdriver to make the holes.
- Paint outside of can with one coat of gesso. Let dry completely.
- Paint can in the desired color and decorate with stickers, etc.
- In a well-ventilated area, spray the outside of the completed can with acrylic sealer spray. Let dry.
- Place enough rocks or pebbles in the bottom of the can to form a single layer; add enough potting soil to fill the can two-thirds full.
- Remove potted herb from its container and transplant into the can.
- Fill edges with remaining potting soil, gently pat down so that plant is firmly in the can but not compacted so much that it’s too tight.
- Place can on a plate (to catch any water drainage) and add some water to the newly planted herbs.
- Create your plant marker by gluing a rectangular piece of craft paper to a popsicle stick.
- Insert your plant marker into the soil, being careful not to crush any roots along the way.
- Place your new garden in a sunny window and remember to water them!
Tips:
- A 4-inch potted plant will be enough to make 2-3 vegetable sized cans (15 oz) or one larger tomato sauce type can (28 oz).
- Keep the kids involved, be sure they take care of “their” plant. Have them water their plant and show them how to check to see if the soil is too dry or just right by gently touching the soil surface with their finger.
- Eat these herbs! Your kids will light up when they get to pinch off a basil leaf to add to your spaghetti sauce.
Craft and photo courtesy of Kaboodle.com.
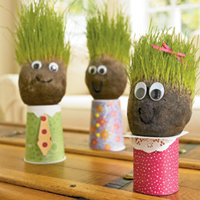
Grass Head Guys
It’s like the Chia Pet for kids! Each child can grow his or her own Grass Head Guy by checking daily on its water and sun requirements. Hair getting too long? Give them a trim or a crazy hairstyle! This is a great craft that will keep them interested for months to come!

What You’ll Need:
- 2 tablespoons grass seed
- Nylon stocking foot
- 1 cup potting soil
- Plastic yogurt container
- Water
- 2 googly eyes
- Permanent marker
- Double-sided tape
- Card stock, craft foam, and so on, for clothing
How To Make It:
- Spoon the grass seed into the stocking foot, and the potting soil on top of the seed.
- Tie a knot in the stocking, leaving the excess fabric hanging.
- Fill a yogurt container halfway with water and place the stocking head on top with the nylon tail in the water to serve as a wick.
- Attach googly eyes to the head and draw on a mouth with permanent marker. To decorate the yogurt container, tape on clothing made from card stock or other materials.
Tips:
- Be sure to check the water level in the yogurt container every day, keeping it at least half full.
Craft and photo courtesy of www.familyfun.go.com.